Why Your Toilet Rocks Front to Back (and 3 Easy Fixes)
Rocking while sitting can be fun, but only if you are in a rocking chair or on a swing. Whether your toilet water is brown, or your toilet is rocking and loose, toilet problems are never a pleasant experience.
If you are experiencing your toilet rocking front to back, but it is not leaking, then all you will need to perform is a quick fix. The main reason your toilet may rock is that it is not flush against the floor.
The best way to solve this issue of a toilet rocking front to back is to fix the flange and steady the toilet by making sure the bolts at the base are tight.
Underneath your toilet base is a toilet flange. This round piece connects your toilet to the drain pipe. If your flange happens to be even a bit higher than the surrounding flooring, the toilet can become raised in the center. This makes it rock from one side or the other.
If you notice this problem slightly, it can get worse. This happens when either the caulk hardens or the floor that is surrounding it begins to settle. Steady the toilet by placing a shim under the base, and making sure the bolts in the toilet base are tight.
You want to find a plastic shim that is small and has ridges. This will help you keep it in place. You should be able to find this at any hardware center or hardware store. Do not use a wood shim because they can be affected by moisture and require to be replaced more often.

When you have a toilet that rocks from front to back, sometimes it can be fixed in one simple step, by tightening the two bolts at the base of the toilet. These are called flange bolts.
Be careful not to tighten the bolts too much as it can crack the porcelain of your toilet. If you do this, you will not be able to repair it and will be forced to purchase a new one.
Tighten the bolts on each side of the toilet using a pair of pliers. You can also use a wrench. If you find that a bolt is loose tighten it very slowly. Make sure both bolts are the same amount of tightness. Close the lid and check to see if it is still rocking. If it does, move on to the next step.
The next step involves making sure that your toilet is not leaking. Look for water around the toilet. You can use a sponge to feel around the toilet for signs of water. Touch the ground surrounding the toilet with the sponge and feel it to see if it is damp.
If you do not see any water then you can continue. If you do see signs of leaking then you have a sign that you have a sealant issue. If you find leaks, then you will need to remove the toilet and replace the wax ring that is attached to the toilet horn.
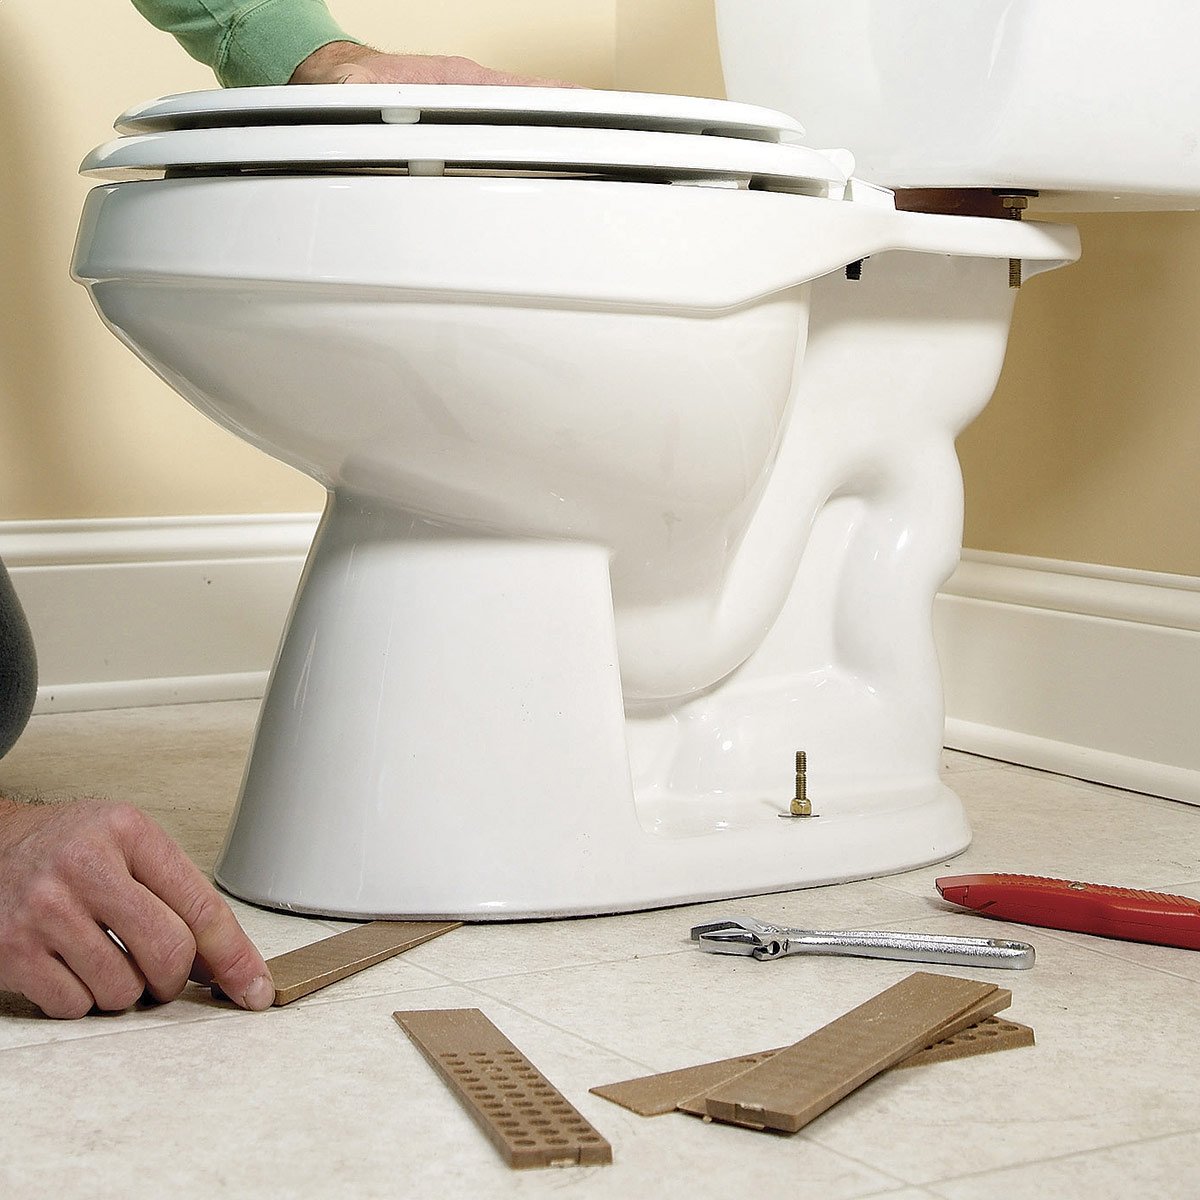
Now you will find out why your toilet is rocking. When looking at the base of the toilet, you should be able to see gaps. These may be small, but will be located between the base of the toilet and the floor.
To locate these gaps you may need to rock the toilet from front to back or side to side. If you feel the toilet rocking but the gaps are too small to see, take a shim and slide it in different places around the base.
Once you have located the problem issue of the unsteady toilet, you can place your shims into those gaps. While placing the shims, try them in different positions. Sit on the toilet with the lid closed and move your body around.
Check to see if the stability is good. If it is not, then add shims until it feels stable. The toilet should not move in any direction while sitting or moving on it.
Since at this point the shims that you just placed may be sticking out a bit, you will need to trim them. Take a very sharp utility knife but make sure you do not cut into the flooring.
If you are concerned about keeping the shims in place, you can add a bit of caulk below them. This will help keep them in place. Note: Let this dry overnight before trimming the shims.
To hide the shims and cover the gap around the toilet, you can apply a thin layer of caulk around the base of the toilet. Make sure this layer is even, and if needed, you can smooth the caulk with your finger. Be sure to wipe your finger clean with water and a paper towel or a rag. This will help keep it even and looking nice. If there is a large gap, you will need to take extra care.
This step is extremely important if you want a finished and cohesive look. It is also important because it protects the underside of your toilet base from having mop water or dirt stuck under it.
Note: Sealing around the toilet base may hide leaks. This can be dangerous because if you do not know there is a leak, you can have problems. Leave a small space on the back of the toilet base to know if you are dealing with a leaking toilet in the future.
Similar to how you let the caulk dry for the shims, you will need to allow the caulk to cure according to the package instructions. Do not sure the toilet until this fully dries.
Movement can damage the wax seal. This can lead to needing major repairs for leaks or other problems.
Yes! You need to caulk your toilet after making it steady because otherwise, you run the risk of particles being trapped underneath it, as well as fostering an environment for mold and mildew to grow.
If your toilet continues to rock, go through the following checklist:
If the ring that holds your flange bolts is corroded or broken, then you will no longer have a grip on the bolts. Often this needs to be replaced.
Additionally, if doing all of the above does not fix your rocking toilet, then you may have worse problems down below. At this point, you will need to remove the toilet, replace the flange, or repair it with a flange repair kit.