How to Remove a Bemis Toilet Seat

Bemis is one of the largest and oldest names in toilet seats. You may have been sitting on one of these for years and never thought about it until you wanted a new seat. But, Bemis uses several ways to fasten their seats, so how do you remove yours?
On any toilet, the manufacturers place 2 holes behind the bowl designed for fastening the seat. So, there must be some form of nut holding it down on the bottom on either side, try to remove the nuts.
You may have to remove covers from the top of the bolts and use a screwdriver to remove them while holding the nut on the bottom.
Older Styles of Bemis may use classical fasteners with only a plain bolt and wing nut. However, newer styles use Top-Tite®, Sta-Tite®, and a new option that includes partially removable toilet seats for easy cleaning.
Most toilet seats use a metal bolt and nut with nylon washers. These grip onto holes in the hinge assembly and the toilet to hold the seat in place. To remove the seat, follow these steps.
This variety of Bemis toilet seat is fastened by a threaded rod screwed into the hinge directly. This removes the need to hold the top still when removing the nut from the bottom.
This fastener style also uses a special variety of plastic nut on the bottom that partially fractures to help achieve the best torque. It leaves behind another section of the hexagonal nut to remove it.
To remove this seat:
The Bemis Top-Tite® fastener system uses a bolt and nut like a classic toilet seat. However, both are made from plastic with heads that fracture when the correct torque is reached during installation. To remove the seat, follow these steps.
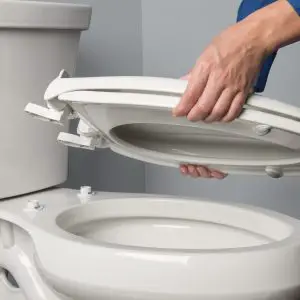
These seats come in multiple styles, but two common types stand out. The first is removed by yanking forward and sliding the toilet seat off the fasteners. The second requires pressing down on the back of the toilet seat until it clicks and pulling up and off the fasteners.
Once you have removed your Bemis Toilet Seat, you will need to install a new one. Fortunately, installing a new Bemis Toilet Seat is not very hard. The steps for installation follow.
 It is not unusual for the nuts and bolts that hold the toilet seat on to become rusted over time. But this situation makes the bolts challenging to remove.
If you have this problem with this, try spraying the nuts with WD40 and letting them sit for a while. Then, try again to remove the nuts.
If this still doesn’t fix the problem, you could try the same procedure using vinegar. Vinegar can dissolve calcium buildup, another cause of frozen fasteners.
If the bolts still remain stuck after trying the above procedures, you may need to cut off the bolts. To cut the bolts off, use a close-quarter hacksaw. In case you have trouble, you may want to cover the area around the bolts to protect your toilet.
A common reason to remove a Bemis Toilet Seat is that the soft close feature stopped working. There are a number of issues that can cause a Bemis Slow Close Toilet Seat to stop working. Typically, all you need to do to fix your slow closing toilet is to clean it.
To clean your slow closing toilet seat, remove the hinges and the toilet seat and clean them with hot soapy water. If they are difficult to clean, soak them for approximately 15 minutes and then clean them. After you thoroughly clean the hinges and toilet seat, the toilet lid should operate correctly.
However, if cleaning the toilet seat does not work, the problem may be caused by a broken hinge. If this is the case, you will need to replace the hinge. Order these hinges by contacting the manufacturer.
Bemis toilet seats rarely come out of alignment due to their plastic bushing inserts and special torquing nuts. However, if the seat comes loose or just needs some adjustment, it is possible.
First, you need to loosen the nut on the bottom side of the toilet seat fasteners slightly. Now, it may be loose enough you can make slight adjustments to the alignment of the seat. If it is not, follow the directions above to entirely remove the seat.