How to Remove a Hard Plastic Toilet Flapper
You may find your toilet is running all the time and may even be flushing by itself. If you’re having this problem and don’t know what to do about it, this article may help you.
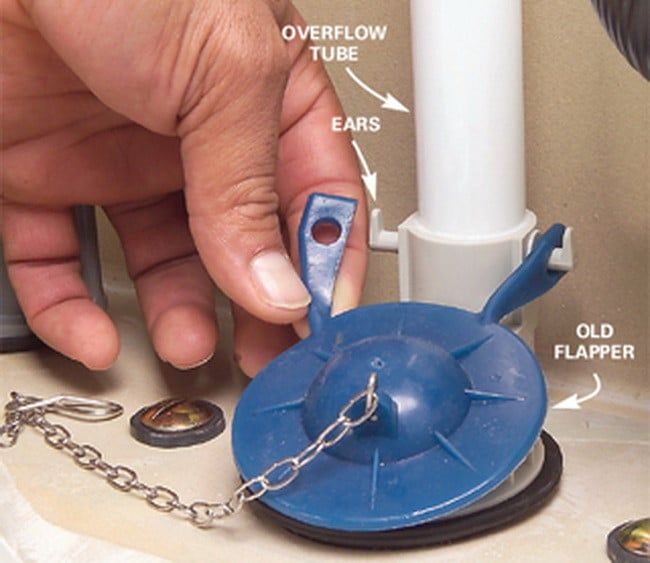
The short answer is to drain the water and remove the chain to the flush handle. Now remove either the two screws or legs that hold it to the overflow tube and pull out.
If your toilet runs continuously or is slow to fill., you may need to adjust the flapper or adjust the flapper chain if you have one. The steps below give instructions for adjusting the flapper chain.
Be careful not to make the chain to long, or the toilet bowl may not get enough water to flush. However, if this procedure doesn’t fix your problem, you may need to remove and replace the flapper.
If you need to remove the flapper, don’t worry, it is not too hard. The steps are listed below.
After removing the flapper, you’ll need to install the new one as described below.
Buy a Replacement. Make sure you buy a replacement that is the same as your current flapper.
The toilet flapper creates a seal with the overflow pipe that keeps the water in the toilet tank. The flapper is typically made of hard plastic or rubber and attached to pegs or posts on the flush valve’s side. There are three types of toilet flappers.
Tank Ball: The tank ball flapper consists of a large rubber ball that sits on the overflow tube, thus sealing it. However, this flapper may not seal the tank adequately if the chain attached to it is the wrong length. If this happens, the toilet may not flush, or it could run continuously.
Seat disc: With this type of flapper, a plastic disc covers the overflow tube. Then, attached to the plastic disc is a plastic tube that is attached to the overflow tube. The weight of the water holds the flapper open during flushing instead of a chain.
Rubber flapper: Most toilets have this type of flapper. It is attached to a chain that lifts it and releases it during flushing. These flappers generally work well, but they could have trouble if the chain is not adequately adjusted.
If your toilet is running all the time, but it does not have a flapper. The problem likely comes from one of two potential causes. It could be due to a damaged fill valve, or it could be due to a damaged lower flush valve seat.
There is one additional variable to consider in these cases as well. Does your new replacement for a flapper have a seal that may have degraded itself?
To replace your fill valve, simply shut the water off, drain the tank, and remove the supply hose. Now unscrew the nut, disconnect the fill hose from the overflow valve, and slide the assembly out.
Replace the fill valve with one that will work with your toilet. Reverse the steps of removal, and follow any manufacturer specific directions.
If the valve is cracked, it will merely need to be replaced. But more often, the seal on top of it simply needs to be replaced. This procedure is simple, and we will tell you how to do it. Follow these steps.
Drain the water from the tank. First, shut off the water by using the shutoff valve typically located below the tank’s left-hand side. Remove most of the water by holding the flush handle down. Now use a sponge or rags to remove the rest of the water.
Remove the old valve seat. It would be a good idea to remove the flapper now as well to get it out of the way. The valve seat should simply stretch and pull off. Make sure no fragments remain on and search for any cracks in the surface below.
Clean and dry the seating surface. The new seal will need a clean and dry surface to properly bond. You may wish to wipe the surface with rags and use a hairdryer to quickly ensure it is completely dry.
Attach the new sealing surface. To do this, remove the paper from the bottom of the ring and gently slide it into position without touching it to anything else. Now push down firmly around the top of the ring to bond it to the ring.
Reinstall the flapper, After installing it, turn the water on. Test the toilet to make sure the flapper raises enough and falls back into place. Also, listen to make sure the tank is not leaking into the bowl.
Probably the most common alternative to the normal flapper is the canister or tower seal. These feature a cylindrical assembly that lifts the seal straight up and down. Theoretically, this will lead to better sealing, but it still uses seals that will degrade and need to be replaced with time.
Here are some generic steps to help replace the seal on most models.