RV Toilet Won’t Hold Water [Quick Solutions]
You might have noticed a bad smell coming from your RV toilet lately, or maybe just a flush that doesn’t clean as well as it should. Either way, these are symptoms of the same thing a lack of water in the toilet bowl.
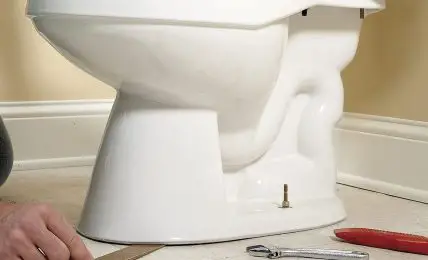
The most common solution to this problem is to replace the blade seals on your toilet. To do this, remove your toilet, separate the top and the base, and replace it.
Normal toilets fall into either one- or two-piece varieties. However, RV toilets work on a completely different mechanism that removes the need for a heavy tank.
Most RV toilets work by pushing a pedal at the bottom of the toilet. This pedal causes a flap at the bottom of the toilet bowl to open. Then, the toilet empties into a black water tank under the RV.
Before you go to the effort of replacing anything, make sure you clean the seal your toilet blade seats against. Generally, RV dealers and supply stores sell special tools to clean off the groove in your blade seal. If you do not have one of these, a nail file will work.
First, turn off your RV’s water pump or shut off the water valve. Bleed any remaining water pressure by flushing.
Now, just take your cleaning tool and spray some cleaner on it. Then, scrape any material out of the groove and rinse it out thoroughly with your spray cleaner. Finish by testing if the problem is fixed.
The blade seal is the most common culprit of an inability to retain water in your toilet bowl. Luckily, these are pretty cheap to replace generally being about $10 to $20 on Amazon.
RV toilets vary in design, but we will provide a general procedure that should help with most toilets. Here is how to replace a blade seal.
If you are on the road camping in an RV, a busted seal could ruin a camping trip with its nasty stench. Unfortunately, you generally do not have immediate access to a replacement blade seal.
However, you may have a temporary replacement among your personal goods. Petroleum jelly may be able to temporarily stop or slow the leak.
This procedure is only temporary and will not preclude replacement. Still, it may hold it off until you can replace it.
Sometimes the pedal, or lever depending on your toilet, does not fully return to its stop position. This can allow water to keep draining even once you release it.
To fix this, try using some penetrating lubricant and spray it into the pedal’s joint. Thoroughly cover it and then work the pedal open and closed repeatedly. This will often help it to sit from now on.
If your toilet is not filling with water, you should first check your pedal and make sure it is working. However, if the pedal works and the toilet still does not seem to be filling with water it is probably the water valve.
Replacing the whole toilet isn’t that hard, but it isn’t that hard to replace the water valve instead. These are pretty easily found and generally will cost between $20 to $50 to buy. Here is how to replace it.
There are a couple of possible problems that may cause low water pressure in the toilet. The problem could be the filter in the foot valve. If this is the case, you remove the valve, take it apart, and clean it.
Low pressure could also be caused by a clogged hose or a kink in the hose. If so, remove the clog or the kink in the hose. In this case, you may need to replace the hose.
You should be careful what cleaner you use to clean your toilet. For example, many commercial cleaners contain bleach, hydrogen peroxide, or other chemicals. These can damage the plastic or rubber seals in your plumbing.
Even some natural cleaners such as vinegar or baking soda can damage the seals. Generally, gentle plant-based cleaners are the best choice for cleaning the toilet.